meta data for this page
- en
This is an old revision of the document!
Temperature, Pressure and Humidity Monitoring with Raspberry Pi
Hardware
Besides a Raspberry Pi - in use is the Raspberry Pi 2 Model B V1.1, the datatransfer takes place over a ethernetcable, the Raspberry Pi 3 is the first one which has a build-in wireless chip - two sensors are needed. In use are the sensors AM2302 for humidity and temperature and BMP280 for pressure and temperature. The only difference between AM2302 and DHT22 is that one has an integrated 5,1 K Pullup-Resistor and attached cables and the other one has pins and needs an external Pullup-Resistor (around 10 K) between the dataconnection and the VCC-Pin, both cases are covered below.
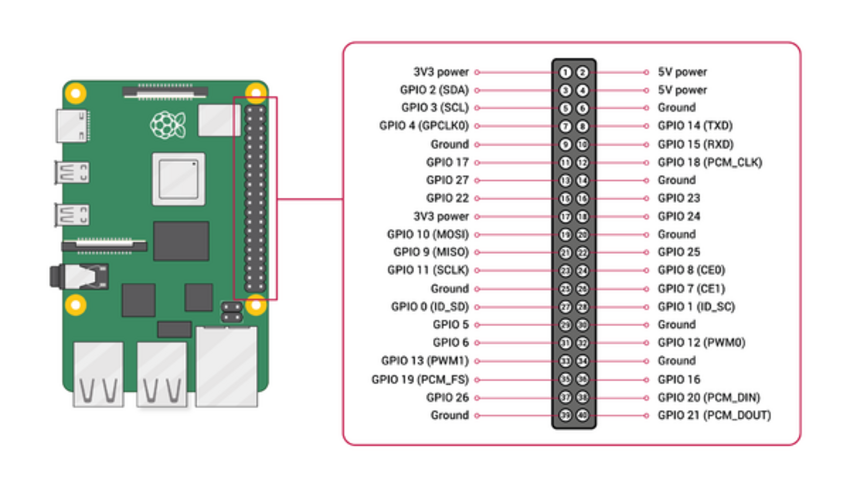
First, you need to connect the sensors as following.

| Raspberry Pi | BMP280 |
|---|---|
| 3,3 V | 1 VCC |
| Ground | 2 GND |
| SCL (GPIO 3) | 3 SCL |
| SDA (GPIO 2) | 4 SDA |
| NC | 5 CSB |
| NC | 6 SD0 |
| Raspberry Pi | AM2302 | DHT22 |
|---|---|---|
| 3,3 V | Red | 1 VCC |
| Ground | Black | 4 Ground |
| some GPIO Pin | Yellow | 2 Data |
This sensor works with 5 V supply voltage, too, but the sensor uses the same voltage on it's dataconnection and the Raspberry Pi can only take 3,3 V on it's GPIO pins, which is why we run the sensor with 3,3 V supply voltage. If you work with an Arduino, consider using 5 V supply voltage instead.
Software
The communication with the sensors is written in C, but there are Python-packages from Adafruit to easily integrate the communication in personal codes and applications. Here's a short overview on how to read out the sensors:
After setting up the Raspberry Pi you need to enable I2C and 1-Wire connection. Enter the command raspi-config and go to Interfacing Options or Advanced Options (depends on your model) and enable I2C and 1-Wire. Reboot afterwards.
Next you need to install some packages using the following commands:
sudo apt install -y python3-smbus i2c-tools
sudo apt-get install build-essential python-dev python-openssl git-core
Go to your home directory with cd ~ and clone the branch of the AM2302 python project with the following command.
git clone https://github.com/adafruit/Adafruit_Python_DHT.git
Then change into the directory you just downloaded:
cd Adafruit_Python_DHT
And compile the code you downloaded, so that it fits your board.
sudo python setup.py install
From now on you can manually read out humidity and temperatur by entering the following command. The first number is the argument for the sensormodel you use (11,22, or 2302), the second argument is the GPIO pin number (not the physical pin number!) you attached your dataconnection to.