meta data for this page
- en
Temperature, Pressure and Humidity Monitoring with Raspberry Pi
Hardware
Besides a Raspberry Pi - in use is the Raspberry Pi 2 Model B V1.1, the datatransfer takes place over a ethernetcable, the Raspberry Pi 3 is the first one which has a build-in wireless chip - two sensors are needed. In use are the sensors AM2302 for humidity and temperature and BMP280 for pressure and temperature.
The only difference between AM2302 and DHT22 is that one has an integrated 5,1 K Pullup-Resistor and attached cables and the other one has pins and needs an external Pullup-Resistor (around 10 K) between the dataconnection and the VCC-Pin, both cases are covered below.
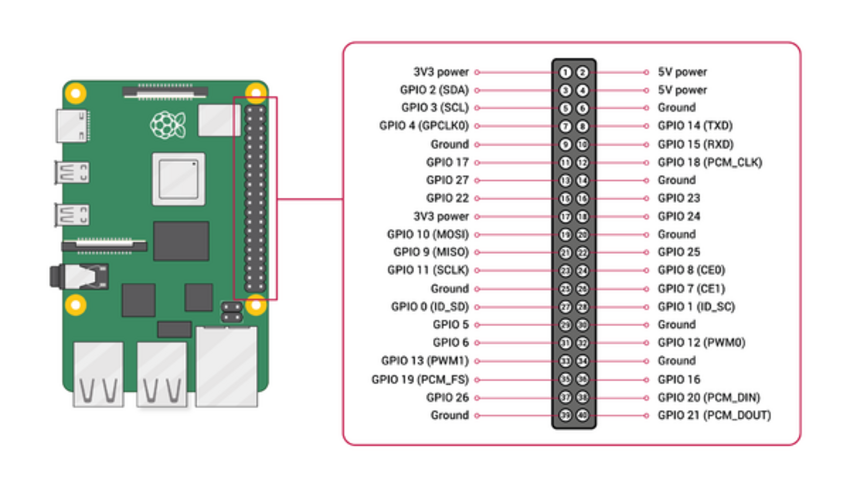
First, you need to connect the sensors as following.

| Raspberry Pi | BMP280 |
|---|---|
| 3,3 V | 1 VCC |
| Ground | 2 GND |
| SCL (GPIO 3) | 3 SCL |
| SDA (GPIO 2) | 4 SDA |
| NC | 5 CSB |
| NC | 6 SD0 |
| Raspberry Pi | AM2302 | DHT22 |
|---|---|---|
| 3,3 V | Red | 1 VCC |
| Ground | Black | 4 Ground |
| some GPIO Pin | Yellow | 2 Data |
This sensor works with 5 V supply voltage, too, but the sensor uses the same voltage on it's dataconnection and the Raspberry Pi can only take 3,3 V on it's GPIO pins, which is why we run the sensor with 3,3 V supply voltage. If you work with an Arduino, consider using 5 V supply voltage instead.
Software
The communication with the sensors is written in C, but there are Python-packages from Adafruit to easily integrate the communication in personal codes and applications. Here's a short overview on how to read out the sensors:
After setting up and updating the Raspberry Pi with sudo apt-get update and sudo apt-get upgradeyou need to enable I2C and 1-Wire connection. Enter the command raspi-config and go to Interfacing Options or Advanced Options (depends on your model) and enable I2C and 1-Wire. Reboot afterwards.
You can check if the I2C kernel module is currently loaded by entering the command lsmod | grep i2c_. It should print the following modules:
i2c_bcm2835 16384 0
i2c_dev 20480 0
If you don't see anything like this, there are several things to do, to force your Raspberry Pi to load the module. Here are just some of them:
- Edit the configfile - which decides which modules should be loaded while booting - with
sudo nano /boot/config.txt. Edit or add the linedtparam=i2c_arm=on, then recompile the rpi-firmware package withmake rpi-firmware-rebuild, regenerate the SD-Card image withmakeand reboot. - If you can't find the i2c-1 bus in /dev, start the i2c module manually by entering
modprobe i2c-bcm2835andmodprobe i2c-bcm2835. Go to /dev and check withls -la /dev/i2c-1if the i2c directory does exist now, which means it's usuable now. This does the same as just using the GUI as described previously, but maybe this way will solve your problem.
Next you need to install some packages using the following commands:
sudo apt install -y python3-smbus i2c-tools
sudo apt-get install build-essential python-dev python-openssl git-core
apt install python3-pip -y
pip3 install –user adafruit-circuitpython-bmp280
To check if your Raspberry Pi found the sensor and to get it's address, enter i2cdetect -y 1. There should be at least one entry, which is your address. If e.g. the last line of the output looks like this
70: – – – – – – 76 –
the sensor has the address 0x76. If you can't see any entry and i2c is enabled and running, check your wires and connections.
Now you can write your python script! First create a file with e.g. touch bmp280.py and edit it with nano bmp280.py. All it takes to read out temperature and pressure are the following lines. Be aware to enter the correct address!
#!/usr/bin/python3
import board
import busio
import adafruit_bmp280i2c = busio.I2C(board.SCL, board.SDA)
bmp280 = adafruit_bmp280.Adafruit_BMP280_I2C(i2c, address=0x76)print(“Temperature: %0.1f C” % bmp280.temperature)
print(“Pressure: %0.1f hPa” % bmp280.pressure)
You can execute the program with python bmp280.py. If you create this file in the /usr/local/sbin directory and allow everybody to execute the program with chmod +x /usr/local/sbin/bmp280.py you can simply execute it everywhere by entering bmp280.py.
Now we take care of the software for the AM2302 sensor. Therefor you don't even need to write a script.
Go to your home directory with cd ~ and clone the branch of the AM2302 python project with the following command.
git clone https://github.com/adafruit/Adafruit_Python_DHT.git
Then change into the directory you just downloaded:
cd Adafruit_Python_DHT
And compile the code you downloaded, so that it fits your board.
sudo python setup.py install
From now on you can manually read out humidity and temperatur by entering the following command in any directory. The first number is the argument for the sensormodel you use (11,22, or 2302), the second argument is the GPIO pin number (not the physical pin number!) you attached your dataconnection to. For example, if your AM2302 sensor is connected to Pin 12, you enter the following command
./Adafruit_Python_DHT/examples/AdafruitDHT.py 2302 18
When you implement a continuous monitoring be aware that the AM2302 can only read a value every 3 seconds, otherwise it'll hang itself up - due to the slow 1-wire connection - and needs to be restartet (unplugged).
Grafana
If used continually, the data has to be sent to a server or similar. An existing sensor sends it's data to Grafana, here's described how:
Applications
Currently this sensor isn't in use anywhere, but one will monitor the conditions in the resonator in ResLab.